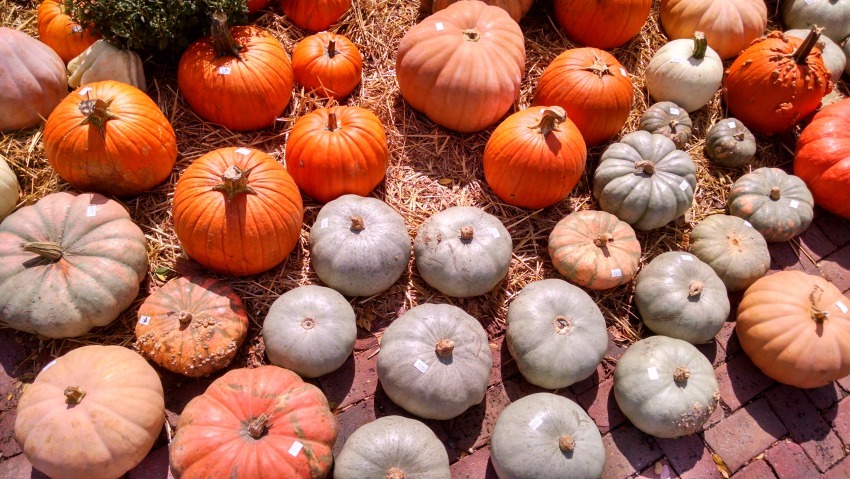
Home Slider

3 Halloween Traditions Explained

jackolanterns.jpg
jackolanterns.jpg

Jack o Lanterns

Halloween is right around the corner! To most of us, Halloween means costumes, candy, and pumpkins, but did you know that this holiday dates back about 2,000 years? It became popular in the early 1900’s, having been brought to America by Scottish and Irish immigrants. Halloween was first called Samhain, which means “summer’s end” in Gaelic and it marked the Celtic New Year. Ever wondered where some of our Halloween traditions have come from? Here are three explained:

Jack-o’-lanterns: The tradition of carving pumpkins for Halloween has its roots in Celtic folklore. The legend tells of a man named Jack who was unable to get into heaven or hell when he died, and his lost soul was condemned to wander purgatory. He used a lit turnip to light his way and the Celts believed that putting Jack-o’-lanterns outside their homes would help guide lost spirits when they wandered the streets. The Irish people originally carved turnips but had to resort to pumpkins when they came to the United States because turnips were scare here at that time.

Trick or treating: Trick or treating started in the 1930s and became a popular US custom in the 1950s. It’s not entirely clear where the US practice of dressing in costumes stems from, but it was believed in olden times that Halloween marked a time where the barrier between our world and the spirit world was the thinnest. It was thought that ghosts could cross into the world of the living and might disguise themselves as humans and knock on doors asking for food or money. People believed that if you turned them away with nothing, you the spirit could curse or haunt you.

Bobbing for apples: Apples used to be thought of as a sacred fruit that could be used to predict the future. Bobbing for them was a fortune-telling game where it was believed that the first person to get hold of an apple from the water would be the first to marry. If the bobber was able to catch an apple on their first try, it meant that they would get to experience true love. Those who took many tries to obtain an apple would have fickle and unreliable romantic experiences. Another belief was that if a girl put her apple under her pillow on Halloween night, she would get to dream about her future husband.

All of us at Garden Supply Company wish everyone a Happy Halloween! If you need a pumpkin or any decorations, stop by and see us!

5 Fun Uses for Pumpkins

Pumpkins.jpg
Pumpkins

Pumpkins

It’s pumpkin time and there are just so many fun things you can do with a pumpkin! They are nutrient-rich, with lots of antioxidants and vitamins. One cup of pumpkin is less than 50 calories and provides a healthy dose of beta-carotene and fiber, so they are great for cooking with. Here are 5 cool ways to make use of a pumpkin:

  1. Eat the seeds: Pumpkin seeds are incredibly healthy! They contain protein, magnesium, potassium and zinc. So, cut off the top of the pumpkin, scrape out the insides, and rinse off those seeds. You can roast them in the oven with a little olive oil and salt and they are a delicious and nutritious snack. Even if you don’t like to eat them, birds love dried pumpkin seeds, so put leftover seeds out as a treat for the birds.

  2. Make pumpkin stock: The inside of the pumpkin has its uses too. Separate out the seeds and put the stringy pumpkin innards into a water-filled pot and bring to a boil. Let the mixture boil for about 30 minutes or until the water has changed color. Strain out any leftover pieces and now you have pumpkin stock! It is great for adding flavor to casseroles or soups. You can easily freeze for later use. If you don’t want to make pumpkin stock, birds also love pumpkin guts, so you can put that out for them as well as the dried seeds.

  3. Cook pumpkin fries: A quick Google search brings up dozens of recipes for pumpkin fries. Making pumpkin fries is a fairly easy process: you simply need to peel the skin off and cut the pumpkin into strips. Spices can be added as you like, and then bake at 350 degrees for about 30 minutes. Here is a really easy recipe from Savy Naturalist: http://www.savynaturalista.com/2013/09/30/roasted-pumpkin-fries/.

  4. Make pumpkin hummus: How about some yummy pumpkin hummus? Dreena Burton’s Plant-Powered Kitchen has an amazing recipe for pumpkin hummus: http://plantpoweredkitchen.com/pumpkin-hummus/. Pumpkin hummus is a fun appetizer for autumn parties!

  5. Cook homemade pumpkin puree: If you’re interested in making your own pumpkin puree, which can then be used for any number of recipes, check out this guide from City Girl Farming: http://www.citygirlfarming.com/Recipes/ByVegetable/CookingPumpkin.html. She gives information on a couple different methods of creating your own pumpkin puree and it’s surprisingly not very difficult. Pumpkin puree is used in a ton of recipes, including pumpkin biscuits, pumpkin bread, pumpkin soup, and even pumpkin cocktails.

And here’s a bonus tip in case you have flowers that you’d like to do something fun with:

  1. Create a flower vase: Use a pumpkin as a festive flower vase. Cut off the top and remove the innards as you would for carving, but then place a container inside. Fill that container with water and flowers and you have a fun, one-of-a-kind vase!

We have pumpkins, so stop in and see us! Our friendly staff can get you set up for all your fall pumpkin and plant needs.

The Incredible, Edible Pansy!

Colorful-Pansies.jpg
Yellow Pansies

Yellow Pansies

Purple Pansy

Purple Pansy

Now is a great time to clean up your planted pots that may be looking a little bedraggled coming off the summer heat. Pansies are a great option to spruce things up, because they will grow and bloom all winter and into spring. Many pansies are bright and bi-colored, making them an eye-catching addition to any garden or pot. Once spring rolls back around, pansies that were planted in fall are usually more robust, having been able to establish strong roots. This plant doesn’t like extreme heat or humidity, which is why they enjoy our fall and spring weather. Pansies are compact and low growing, so they are ideal for edging, borders or container plantings. They grow into clumps as opposed to spreading along the ground, and most varieties will reach a height of 4 – 8 inches. This flower is a great match with spring bulbs. A popular method for mixing pansies with spring-blooming bulbs is to plant bulbs in a garden bed, and then plant pansies right over the bulbs. In the spring, the bulbs will bloom and, as their flowers wilt, the pansies will be beginning their spring bloom. This is an excellent technique to maximize your garden bed color in the spring. Tulips or daffodils are a couple options that look great with pansies. Some cool-season annuals that complement pansies well are snapdragon, calendula, and nemesia. 

Pansies are fairly easy to grow and will flourish under most conditions as long as they have good soil and at least partial sun. They like steady moisture so don’t let them dry out too much. One of the top reasons pansies fail is not getting enough water, so keep an eye on them and water if you notice they have dried out. Pansies respond well to deadheading, so keep plucking the wilting flowers off of ‘em. Ensure the plant has adequate nutrition by amending the soil with soil conditioner and Bio-Tone starter fertilizer.

A fun fact about the pansy flower: it’s edible! It has a mild, almost minty flavor and tends to be used a lot for decorations and as a garnish. (If you decide to sample some pansies, make sure no pesticides have been used on the plant.) Drop by and see us, we have a fantastic supply of pansies right now that will do a great job of giving your garden or containers a fun pop of color!

Plant Fall Bulbs for Spring Blooms

springbulbselection.jpg
2014-09-20 13.27.40

2014-09-20 13.27.40

Planting flower bulbs in fall is a fast and easy way to have beautiful flowers pop up in the spring. Just imagine: a little work now means that you’ll wake up one spring morning to a flower-filled garden! Bulbs are a favorite of both beginner and experienced gardeners because they are easy to plant and most require very little maintenance. Here are a few quick tips for planting bulbs:

  • Read the label and keep it with the bulbs up until the moment you plant. It’s the only way you can keep track of what you have so that when you start designing your spring garden, you can keep track of which plants and colors you are putting where.

  • Don’t plant bulbs in an area where water collects because they don’t like to sit in extremely wet places and they can rot under those conditions.

  • Make sure they get enough sun—bulbs like full sunshine.

  • Plant bulbs with the pointy end up and if you can’t discern the pointy end, check to see if there are any flattened or shriveled roots on one end, which would be the end that needs to point downwards.

  • Mix compost in the hole with the bulbs because like any plant, they enjoy well-drained and nutrient-rich soil.

  • Water bulbs well after you plant them to encourage them to send their roots out into the soil and start growing.

springbulbselection.jpg

Selection of Spring Bulbs

When it comes to designing your spring garden, plant bulbs in clusters for the greatest impact, it gives a concentration of color that is impossible to miss! For a natural-looking drift effect, toss a handful of bulbs in the air and plant them wherever they land. Another fun technique to try is to do a “double-decker” effect where you plant small bulbs in a layer on top of larger bulbs. As long as they all flower at the same time, this will create a beautiful mixing of two flowers. You could also use this method with bulbs that will bloom at different times to ensure that you keep color in the garden bed as long as possible.

If you are interested in learning about planting bulbs this fall, don’t miss our class: Fall Bulbs for Spring Blooms on Thursday, September 25th, from 6pm - 7pm. Our experts will help you learn fall bulb planting so that you have a masterpiece garden come spring!

Fall is the Perfect Time to Plant Trees and Shrubs

2014-09-14-17.43.49.jpg

trees and shrubs

As we begin to transition from summer to fall, now is prime time to plant trees and shrubs. If planted now, trees and shrubs will put all their energy into root growth.  Roots will grow throughout the winter months to store nutrients for next season. Trees and shrubs need less water during winter, because shorter and cooler days decrease the rate of photosynthesis. Trees planted in the fall are better able to withstand the heat and drought of the next summer. Soil is warmer now than it was in the spring, and it will remain warm even after air temperatures start dropping. Pick a good location for your tree or shrub that will provide it with the appropriate amount of sun or shade and meet its moisture requirements. Dig a hole that is twice as wide as the root ball and no deeper (the top of the root ball should be above soil level). The root ball will lower a bit as the soil settles, and you don’t want it to end up too low in the ground. If planted too deeply in the ground, the plant can suffocate because not enough air will reach the root system. Break apart and loosen the roots if they are pot bound, so that they can more easily spread out once in the ground.

Once your hole is dug, use the shovel a few times in the bottom to loosen the soil and make it a little easier for the roots to expand outward. Amend the soil with composted cow manure, soil conditioner and organic fertilizer. Organic fertilizer is good to use in the fall because it contains a healthy dose of good bacteria and micro-nutrients, so it isn’t going to drive a lot of foliage growth, but will help the root system immensely. The mixture should end up being composed of a third of the existing soil, a third cow manure and a third soil conditioner. In addition to that mixture, we suggest using Espoma Bio-Tone. This is a starter fertilizer that contains myccorhizae (a type of fungi that roots rely on to help them gather nutrients) and other beneficial micro-nutrients that will help the plant establish a bigger and healthier root ball.

Spread a couple inches of mulch over the area to protect the roots and water well. Trees and shrubs have high water needs as they attempt to establish a strong root system.

Any tree or shrub that has been grown in a container or has burlap around its root ball can be planted in the fall. Do you have more questions? Stop in and see one of our friendly staff members who would be glad to assist you with your fall planting needs!

Planting a Cool Season Vegetable Garden

Cool-Season-Veggies.jpg
Fall veggies to plant - beautiful red leaves

Fall veggies to plant - beautiful red leaves

We’re heading into the homestretch of summer, which can only mean one thing: it’s time to plant cool season vegetables! Here in North Carolina, spring temperatures can climb quickly, which makes vegetables such as lettuce or spinach develop a bitter flavor. Those veggies, along with others such as broccoli, cauliflower and carrots, generate the best flavor when they mature during cooler weather. Planting these crops now means you’ll have a harvest of produce that will carry you well into the fall and winter. There are a number of cold-hardy crops that prefer the cooler temps and higher moisture levels that come at this time of year. Late planted vegetables usually have less competition from weeds and there are fewer pests around to bother them. Some of these plants can grow very quickly from seeds and be ready to eat in a little over a month. Arugula, mustard, spinach, turnips and radishes all germinate from seeds and are ready to harvest in about 40 days.

To ensure success of late harvests, make sure seedlings have enough time to create well-established root systems before the first frost hits. It’s best to plant cool season vegetables in raised beds or mounded rows, and seeds should be planted deeper because the moisture level of the soil is lower and the surface temp is higher. The planting depth may be as much as twice as deep as for spring planting of the same crop. Give your plants a layer of manure or compost that is several inches thick to help the plants establish strong roots, provide adequate drainage, and supply the necessary nutrients for proper plant growth. Sprinkle fertilizer over top of your plantings for extra nutrients and continue to fertilize them regularly in the early growth stages.

Most vegetables need about an inch of water per week. For cool season veggies, it is best to do a single watering that seeps deep into the ground, rather than several applications that soak more shallowly. Young seedlings, germinating seeds, and transplants may require some light watering between the weekly soak.

Most cool weather vegetables can tolerate a light frost, but if a harsh frost hits, you will want to cover your beds with burlap, tarp or a blanket to protect plants.

Below are some suggestions of cool season vegetables to plant:

Salad greens to plant for fall harvest

Salad greens to plant for fall harvest

  • Asparagus

  • Beets

  • Broccoli

  • Brussels sprouts

  • Cabbage

  • Carrots

  • Cauliflower

  • Collards

  • Cucumbers

  • Kale

  • Lettuce

  • Onions

  • Radishes

  • Rutabaga

  • Spinach

  • Turnips

If you’re thinking about starting a cool season vegetable garden, stop in and see us! Our friendly staff is on-hand seven days a week and can help you with all of your gardening needs.

Cool Season Herbs and Veggies are Here!

gsco82.jpg

As the season changes, so should your garden. There are many vegetables and herbs that do well as the temperature drops. Keep your garden going year-round with hardy plants that can take cooler temperatures. We have a variety of plants to choose from so come by to see what has arrived. Here are a few of the herbs and vegetables we have in stock and why they make such great cool season plants for your garden.

Fast growing leafy salad crops like Butter crunch lettuce will keep your garden looking green. This type of lettuce is nutritional and has a rosette shape. It needs full sun to grow so give it plenty of light. Butter crunch does best in a moist soil and will last up until the first hard frost.

gsco68

gsco68

Beets make a great cool season crop as well. They grow quickly and can survive the frost. Beets are full of vitamins and studies are being done to prove whether or not they can help lower blood pressure. Beet greens (the leafy part) are also edible and full of nutrients.

gsco69

gsco69

Rosemary is a hardy herb that can handle cooler temperatures, but it is a good idea to bring it in once there is potential for frost. This flavorful herb is often used in rubs for lamb, pork, and turkey. It is also used in oil based dressings and marinades. Consider using Rosemary next time you decorate a wreath or make potpourri as well.

gsco67

gsco67

Spinach tolerates cool weather very well and should be planted about 6-8 weeks before the first frost in nitrogen-rich soil. It grows quickly and is very healthy. Spinach is rich in vitamins and minerals. Toss it in fresh with a salad or cook it into your next stir-fry.

gsco83

gsco83

Sage is a beautiful herb that does well in the south once the humidity level lowers. It is often used in stuffing, but sage also goes well on pork, poultry, and vegetables.

gsco82.jpg

gsco82

Thyme is an aromatic herb often used in cooking. It grows best in soil with a high pH. Add a little Thyme to your next slow-cooker meal or mix it into butter or mayonnaise to add flavor. It even tastes delicious in tea.

gsco81

gsco81

Don’t forget to follow us on Facebook to hear about more new arrivals to the store!

Tips for Creating a Pollinator-Friendly Garden

Bees_on_Coneflower.jpg
A bumble bee dangles from a flower

A bumble bee dangles from a flower

Did you know that a high number of pollinators equates to a very healthy ecosystem? The more pollinators, the more biodiversity of plants there is. In fact, some plants are entirely dependent on the help of pollinators to pollinate and reproduce. The term pollinator describes an animal that moves pollen between parts of a flower and includes butterflies, bees, birds, bats, and other insects and mammals. It's certainly worthwhile to create a garden which is pollinator-friendly. Not only will you get to see increased wildlife activity, but you will also be doing a favor for the environment. Pollinators are attracted to flowers by their color or scent, and flowers bloom at different times of the day depending on what type of pollinators they want to attract. Flowers that bloom during the day are generally bright colors and trying to attract bees, butterflies, or other insects. Flowers that bloom at night are usually sweet smelling with a pale color to attract moths and bats.

To create a garden for pollinators, try to have plants that bloom at various times of the year, so that there is always something for them to snack on. Different types of pollinators have different habits and need pollen or nectar at different times of the year. Plant in clumps as opposed to a single plant, and consider using species native to your area. Native plants are more likely to survive and thrive, plus, they are best suited to nourish your local pollinator population. Old-fashioned flower varieties are best for pollinators. Avoid using modern hybrids because many have been bred to have double-flowers, and don't have the pollen or nectar that pollinating species are looking for. Gardens with a wide variety of plants are most attractive to pollinating species.

Other garden features can make your garden more livable for pollinators. Just like any living being, they need food, shelter, and water. A butterfly house is a good way to invite butterflies into your garden. If you decide to install a butterfly house, consider growing plants which their larvae can eat (and be prepared to see some munched-on leaves). Plants such as milkweeds, dogwoods, and verbena are all excellent choices. Having a shallow dish of water helps pollinators, especially those in the midst of a long migration. Keep in mind: butterflies cannot drink open water and, instead, must drink from wet soil or sand.

It’s important to carefully consider the use of pesticides when planting for pollinators. The chemicals can be harmful to them if ingested or if they land on a plant surface that has been sprayed. Fast-acting, short-residual options are best if you must use pesticides, and try to find the least toxic pesticides possible. Also, spray at night, when pollinators like bees are least likely to be active. Your safest bet is to steer clear of these chemicals altogether.

In summary, here are our tips for starting a pollinator-friendly garden:

  • Plant a variety of flowers that bloom at different times of the year

  • Stick to old-fashioned plants

  • Plant in clumps

  • Use native species

  • Add elements which provide water and shelter

  • Avoid pesticides when possible

Here are some suggestions for pollinator-friendly plants:

  • Honeysuckle

  • Bee balm

  • Coneflower

  • Sunflowers

  • Zinnia

  • Black-eyed Susan

  • Geranium

  • Shasta daisy

  • Milkweed

  • Spider wort

  • Catmint

  • Anise hyssop

  • Passion flower

  • Hydrangea

  • Azalea

  • Mountain mint

  • Goldenrod

  • Joe-Pye weed

  • Butterfly bush

  • Salvia

  • Dogwood

  • Violet

Glass Bird Baths Have Arrived!

gsco50.jpg

There are many ways besides flowers to add color to your garden. Garden Supply Co has just gotten in some lovely colored glass bird baths. As the leaves turn in the next couple months, these bird baths will stay as a vibrant pop of color in your outdoor space. Not only are they beautiful, but they are also functional. Bird watchers will love watching birds stop by for a refreshing dip in one of these interesting bird baths.

gsco50.jpg

gsco50

This Tiffany inspired bird bath is sure to add elegance to your space along with an old-world touch.

gsco51

gsco51

This peacock pattern is sure to make your garden feel exotic.

Come by the store soon to check out these exciting additions to our inventory. They are sure to please.

Chalkboard Love

gsco56.jpg

One of the latest home decor trends is the chalkboard. They are no longer just for schoolrooms, but they do evoke the nostalgia that many people associate with their days in class. Since they are associated with nostalgia, chalkboards add a vintage or retro touch to a space.

Chalkboards can be both functional and decorative so many people have adopted them. Their functional aspects are practically endless since you can so easily change the message. At the same time, chalkboards can be decorative because they come in so many different shapes, sizes, and designs.

Chalkboards are great for kitchens because you can write down groceries and to-do lists. They also look great in entry ways because you can write welcoming messages to your guests on them. Here are a couple of examples available here at Garden Supply Co.

gsco53

gsco53

gsco52

gsco52

Some chalkboards are even magnetic, making them great for refrigerators. This can add interest to an otherwise uninspiring surface.

gsco57

gsco57

With the rise in popularity of chalkboards, people have begun to take the idea to a more permanent level. Many people love the look of chalkboards, but want more elaborate designs than are possible with regular chalk. Chalk tends to smudge easily so “chalk-inspired” wall-art is a great alternative. You can still get the look of a chalkboard while achieving a more intricate design that is permanent. Here are some “chalk-inspired” options from Primitives by Kathy. These sweet and silly sayings add a decorative touch that one cannot achieve with a regular chalkboard.

gsco56.jpg

gsco56

gsco55

gsco55

gsco54

gsco54

Chalkboards are a trend that is still on the rise. They will continue to permeate the market because they allow for creativity and add a personal touch to any space. Keep chalkboards in mind next time you are looking for home decor. There are a variety of possibilities available and the stock is always changing.

Beauty in Chaos: The Basics of Cottage Gardening

cottage-gardening-feature-pic.png

A cottage garden is a colorful tangle of tumbling flowers and plants that provides a cheerful welcome for visitors. This gardening style is an exercise in creativity and an expression of individuality, with each garden being completely unique. If you've ever thought about starting a cottage garden, here are some tips to get you started: The basics

IMG_20140802_112704403_1 (1)

IMG_20140802_112704403_1 (1)

  • Invest in your soil: Soil quality directly affects plant quality, so make sure soil amendment is one of your first undertakings. Soil is filled with organisms that are essential to healthy plant growth, and adding manure or compost is a perfect way to ensure plants have the nutrients they need.

  • Consider light conditions: Keep in mind that plants in their ideal conditions are going to thrive and require less upkeep. In general, flowering plants need more sunlight than foliage plants. Have a good idea of how much sun your garden area gets and at what times of the day: is it morning or afternoon sun? Some plants may prefer one or the other.

  • Start with a small area: This allows you to experiment with various plants and slowly build a more intricate garden. You can always move things later if you change your mind.

  • Tall in the back, short in the front: Be sure to position plants with regard to their height so that there is visual interest to pull the eye up and down. Also, take spacing needs into account so that full-grown plants don’t end up crowding each other.

Plant considerations

There are no right or wrong plant choices for this type of garden. Cottage gardens have a soft, romantic feel, which comes from classic flowers. Some traditional cottage garden plant examples are: hollyhocks, daisies, phlox, foxglove, roses and lavender. Don’t overlook fruits, herbs and vegetables as options: not only are they ornamental, but they are a return to the original purpose of cottage gardens, which was to produce food and flowers for a family.

beautifulflowers

beautifulflowers

It’s important to consider plant textures and shapes. Part of what makes a cottage garden exciting is the artful mixture of a variety of plant shapes and hues. Varying textures and colors give a cottage garden depth and, while at first glance things may seem chaotic, viewers quickly realize that there is a flow and balance in these gardens. Repeating plants or colors is a good way to create harmony and avoid a garden that appears jumbled.

Incorporate objects and barriers

Dress up your cottage garden by creatively using decorative objects, as well as fences and barricades. Fences or barriers can neaten the look of rambling plants and provide support for tall vegetation. When it comes to sculptures or decorations, the more offbeat, the better! Twig structures, lattices, sundials, birdbaths, and fountains are some objects to consider. Natural or worn materials look right at home in cottage gardens, but don’t overdo it: the plants should steal the show.

And the biggest tip for cottage gardening is to just have fun with it! These gardens are ever-evolving, so it’s perfectly okay to keep tweaking plants, placement and objects until you find the combination that speaks to you. Above all: take time to relax and enjoy your garden!

For more gardening tips, be sure to visit the garden center. Our friendly staff is on-hand seven days a week with answers to all your gardening needs.

Join Gardeners for the Cure

Fourteen years ago I joined the "Race for the Cure" and began to work with our local affiliate of the Susan G. Komen Foundation spear-headed by the generous Jeanne Peck, Katie Shaw, Carol Griffin, and countless other volunteers when my mother was diagnosed with stage 4 breast cancer.Frustrated I couldn't battle this disease for her, I went to battle by fundraising with my husband's idea of the "Gardens for the Cure"  It was a one day glimpse into some of the areas most beautiful gardens to raise awareness and money.  During those years we raised over a million dollars and shared many happy days with her.

Today my mom is not with me, but her spirit lives on in our team.  She not only fought for her own life, but also for her children, grandchildren, friends, and husbands, the 1 in 8 of us, so we would not hear the words "you have breast cancer".  

The Susan G. Komen Foundation funds cutting edge research and puts the money where it was needed in our local communities. The principle of giving 25% of the money raised towards research grants nationally, and the other 75% staying locally to fund grants like mobile mammography for underserved women in our community is the reason I still support them.  Forget the politics and donate today...together we can bring a cure and make a world without breast cancer.

~Deborah

Gardeners-For-the-Cure-2013entry-Garden-Supply-Co

Gardeners-For-the-Cure-2013entry-Garden-Supply-Co

To donate and register for our Gardeners for the Cure team, please visit our team page:

http://nctc.info-komen.org/site/TR/RacefortheCure/DUR_NCTriangleAffiliate/716615525?pg=team&fr_id=4016&team_id=299727

When you join our team with a $50 donation, you will receive a 12% discount off all your purchases the rest of the year as well as our Team t-shirt.  For a $100 donation, we’ll throw in a coupon good for 35% off any one item from the garden center.

Gardeners-For-the-Cure-2013

Gardeners-For-the-Cure-2013

In addition, we have some prizes up for grabs, including  two airline tickets anywhere in the contiguous U.S. for whoever raises the most dollars. Ask 10 friends for $10 and help us eradicate Breast Cancer in our lifetime!

Race Details

The Triangle Race for the Cure® will be held Saturday, June 14, 2014 at Meredith College in Raleigh, North Carolina.

Race Day Schedule:

5:30 a.m. – Shuttle buses begin at the PNC Arena (formerly named the RBC Center).  All parking is at the PNC Arena.

6:00 a.m. – Registration/Packet Pickup Opens

6:45 a.m. – Survivor Breakfast Begins

7:00 a.m. – Competitive Open 5K (co-ed)

7:00 a.m. – Survivor Photo

7:15 a.m. – Zumba Warm-up

7:45 a.m. – Women’s Only – Jeanne’s Race 5K Run/Walk

8:30 a.m. – Recreational Open 5K Run/Walk (co-ed)

9:30 a.m. – One-Mile Fun Run/Walk (co-ed)

10:00 a.m. – Kids Dash (ages 3-5)

10:30 a.m. – Survivor Tribute

We’ll be there, walking again this year with our team, and we’d love to have you join us.If you would like to join us, you’ll have to pick up your registration packet and race bib at one of these locations.

  • June 9th – 6-8:30 p.m. – Streets of Southpoint Mall – Center court near Nordstrom

  • June 10th – 6-8:30 p.m. – Crabtree Valley Mall – Lower level outside Belk

  • June 11th – 6-8:30 p.m. – Cary Town Center – Outside Belk

  • June 12th – 6-8:30 p.m. – Triangle Town Center – Lower level center court

  • June 13th – 11 a.m. – 7 p.m. – Meredith College – Near the chapel

  • June 14th – 6 a.m. – 9:30 a.m. – Meredith College – Near the chapel

If you’d prefer to “sleep-in for the cure”, we have that option, too!

For more information on the event, please visit the Susan G. Komen Triangle website, and our Gardeners for the Cure team page. And thank you all for your support!

Featuring: Sock it to Me!

IMG_2829

IMG_2829

We're featuring SOCK IT TO ME socks at the store this week!

What started as a tent at an outdoor market has turned in to an international company. One twenty something's vision has allowed us to enjoy these little funky accessories on a daily basis. Whether you're a ladybug, bacon or peacock girl, we're got you covered. There are many different designs and colors to choose from. We also carry men's crew socks with mustaches, beer or antlers.

IMG_2831

IMG_2831

IMG_2832

IMG_2832

Stop by to browse our selection!

IMG_2834

IMG_2834

Fresh from the Farm, Flower Power Perennials

20140516_175718.jpg
20140516_175718.jpg

20140516_175718

Fresh from the farm are an overflow of power house perennials.

Fresh from the farm are an overflow of power house perennials. Yarrow, Agastache, Catmint, Guara and Catmint are all heat tolerant and sun loving, deer resistant with blooms from late spring through fall.  These varieties are just a sampling of our diverse selections.    To help sweeten the deal, we offer a quanity discount on our perennials: buy 5 for 5% off, 10 for 10%, 15 for 15% and 20 for 20%, so come onin while inventory diversity is larger than ever!

yarrow

yarrow

yarrow pink grapefruit

yarrow pink grapefruit

Yarrow color                                                                                                       Yarrow 'Pink Grapefruit'

Grandmother was a gifted gardener and her out door space was full of Yarrow outlining the peremiter of the vegetable beds around  her prized Tea Roses and sprinkled throughout.  This was not because it was her favorite cutflower, but because it is a work horse of a companion plant.  Naturally it repels some insects and attracts many of the ones you desire like Butterflies and Lady bugs, which love to snack on pesky Aphids and other predatory insects.   Placing dried yarrow under door mats is another trick to keep the bugs at bay.  We have several different varieties including 'Pink Grapefruit,' 'Strawberry Seduction'  and 'Pastel Series.'

agastache orange nectar

agastache orange nectar

agastache blue fortune

agastache blue fortune

agastache grapefruit nectar

agastache grapefruit nectar

Agastache 'Apricot Nectar'

Agastache 'Blue Fortune'

Agastache "Grapefruit Nectar'

We at Garden Supply Co. have gone bonkeroos for Agastache and have a bumper crop. In stock are both the Giant Hyssop and Threadleaf varieties.  Agastaches range form 5 feet tall down to 15 inches with the newer compact varieties in the nectar series.  With delicious names like 'Apricot Nectar,' and  'Grape Nectar,' this new series are shorter and support the bounty of tubular  blooms that provide a long feast for the wildlife.  These long showy flowers were still going strong well into the heat of late summer even in their small containers here at the shop last year.   The blue, fringy foilage of some varieties  provides contrast to large leafy perrenials in a mixed bed.

guara pink

guara pink

white guara

white guara

crimson butterflies guara

crimson butterflies guara

"S

Gaura 'Siskiyou Pink"

Guara 'Whirling Butterflies'

Guara "Crimson Crimson Pink'

Guara, commonly called whirling butterflies really does resemble it's name sake.  This native wisps in the wind and has evolved to have natural defenses against our neighborhood deer.   Colors range from pink to white with some varieties having crimson foliage.

cat mint curb appeal

cat mint curb appeal

nepeta little titch

nepeta little titch

Nepeta 'Walker's Low'

Nepeta 'Little Titch'

Talk about curb appeal!  Nepeta better know as cat mint ranges in size from 8 inches to 2 feet and really does flower in our southern heat from spring to fall.  Check out the bed planted on the inside of our left entrance next time you are at the shop.  Looks great with red knock out roses.

salvia suncrest golden girl

salvia suncrest golden girl

salvia lyrata purple knock out

salvia lyrata purple knock out

salvia ultraviolet

salvia ultraviolet

.

Salvia 'Suncrest Golden Girl'

Salvia lyrata 'Purple Knock Out'

Salvia 'Ultra Violet'

Salvias range in color from a true blue, pink, red, white, yellow, purple and everything in between.  There are so many great ones my next post may be just about Salvias alone.  Hope to see you soon to show you first-hand some of these long lasting, color perennials that are both deer resistant and heat tested.   Remember our quantity perennial sale is ongoing, so come take advantage of this fresh from the farm bumper crop of perennial flower power.

Upcoming Classes

IMG_2755.jpg

We have three new and exciting classes in store for you! Check out the descriptions below and call or stop by to sign up. All three will be taught by Lauren White  

IMG_2755.jpg

IMG_2755

IMG_2753

IMG_2753

IMG_2759

IMG_2759

Garden Critter Succulent Stake Class- May 29th 5:00PM

You’ll be making your own personal garden art with a butterfly or bumble bee garden stake. Different types of succulents will be put in the middle to create a upright planter affect. This will be a truly unique and creative class! $45 includes all materials.

Concrete Leaf Class- June 12th  5:00PM

Using actual leaves, you’ll create your very own piece of garden art! Use your leaf as a step stone, garden bowl or just to add a little extra flair to your garden! Please bring your own leaf (that can fit into a GSCO box) and we'll provide the rest. $35 includes all materials.

IMG_2760

IMG_2760

IMG_2763

IMG_2763

IMG_2762

IMG_2762

Hypertufa Planter Class- June 26th 5:00PM

Using a hypertufa mixture, you’ll create your own planter for your garden. Different textures can be created using leaves, mesh and lace. Please plan ahead for a 2-3 weeks set time then plant! $35 includes all materials.

What to do about cold damage

What to do about cold damaged plants

Here it is the first full week of spring and the weather man is calling for more ice!   Lots of plants are winter burnt and defoliating, some were literally crushed by snow and falling branches.  Daily I am asked and shown pictures of sad evergreen shrubs with fellow gardeners asking, "what do I do?" Frequently, the questions are about Loropetalums, Gardenia Radicans and Camellias.  There are three steps: treat with horticultural oil, fertilize then prune, but timing is everything.   

Crispy Loropetalum and Radicans Gardenia

20140305_090021

20140305_090021

20140305_090029 (1)

20140305_090029 (1)

 Winter damaged plants are a magnet for disease and insects.   The ideal time to spray with horticultural oil is in early spring just as temperatures are rising and we are having our first warm days.  It is easier  to prevent major infestations than treat them once present.   This organic approach simply smothers pests as they begin their early life cycles in spring.  Pay attention to the bees while spraying. Treat  in the evening when bees are less active and never spray on trees and shrubs while in bloom.   Pollinators are important for our existence, with out them our fruit trees will be barren.  

20140326_174000

20140326_174000

 Fertilize with proper organic plant tone products.   Just like us, our plants perform better when nourished.  Finally, and most importantly, please do not start pruning  already damaged plants until  we are sure that early spring frosts are over, which can be as late as mid April in the Carolinas.  Fresh cuts down to the live wood will only increase chances of deepening the winter damage in the next deep freeze.  I typically wait to see new growth until I make many cuts on very damaged plants so I can see where the dead wood ends.  One can also scratch the wood to determine of it is green and viable before making cuts.  Cutting above the next leaf or branch terminal with sharp pruners at an angle to leave clean  margins is the best. 

Sadly, some of our plants did not make it through this harsh winter.  The silver lining is the opportunity to pick out more plants for our outdoor spaces!  Please, feel free to come by the shop with any questions about repairing your damaged plants, samples and pictures always help.  It is important to know when to say when, for example, below, here is a Loropetalum that can be healed placed beside one that I would remove because the damage is too severe.  So, remember there is a perfect plant for every location the three steps to repairing winter damage include, horticultural oil, fertilizing and proper pruning. 

Ruby Loropetalum 

dead alive

dead alive

Smokin' New Wood Fired Oven by Fornetto

fornetto-big.jpg
modern-grills

modern-grills

We are now excited to carry the beautiful Fornetto wood fired oven and smoker for your outdoor entertaining needs. This model is packed with feautures one would only expect to find on indoor ovens, truly raising the bar on outdoor cooking. "Featuring solid cast iron doors, stainless steel oven interiors, and a separate fire chamber, the Fornetto ovens offer a safe and easy way of creating authentic pizzas, amazing roast meats, baked breads, pastas, and desserts, or smoking an endless variety of foods in your own backyard or patio." My favorite recipe in the Fornetto wood fired oven: Apple and Berry Cobbler

A blackberry cobbler recipe with blackberries and apples, along with sugar, butter, and other ingredients (dessert of course)!

Preheat Fornetto oven to 200°C / 350°

Cooking Time 45 minutes

Cream butter and 1/3 cup sugar until light and fluffy. Sift together the flour, baking powder and salt. Add dry ingredients to creamed mixture alternately with the milk, beat until smooth. In a separate bowl, combine blackberries, apples, and 1⁄2 cup sugar. Put fruit mixture in a buttered 9inch round cake pan. Pour batter over the fruit. Sprinkle with a little sugar. Bake for 45 to 50 minutes.

Serve with cream or ice cream.

The wood fired cooking brings a different depth of flavour to the food including desserts.

Serves 6 - 8

Option: Many different fruits can be used as substitutes with this recipe. Use firm fleshed fruits such as apples, pears, nashi, peaches or nectarines. Berries such as blueberries, blackberries and strawberries can also be used.

Once you’ve finished cooking your main meal, with your oven still hot - baking your dessert makes great sense. It is also convenient to have your desserts cooking outdoors when you are entertaining outdoors – this way you can stay with your guests and won’t be missing out by having to return to the kitchen to check on the dishes.

For more great recipes in the Fornetto wood fired oven and smoker, visit the www.fornetto.com/recipes

The Time to Fertilize is Now!

garden-essentials-large.jpg

FEED ME!!! This is what all of your plants are screaming right now! If you are not on a regular fertilizing schedule, now is an opportune time to start. As we approach the warm weather plants are begging for food because they are about to take off.

WHAT IS N-P-K you say... ?

  • Nitrogen, or Nitrates, are essential components necessary to produce the protein in plants. As a result, plants grown with nitrogen added to the soil are stronger, healthier and bigger.
  • Phosphorus functions as one of the major players in the process of photosynthesis, nutrient transport, and energy transfer. It supports robust and brightly colored blooms.
  • Potassium in most fertilizers is water soluble otherwise can't be absorbed by the plant roots. Potassium controls the plant cells that use water. Without enough potassium, the cells don't efficiently use water and the plant is unhealthy. It then becomes vulnerable to disease and heat stress. Potassium also aids the enzymes promoting plant life. Without potassium, the plant cannot cycle the nutrients to feed roots, leaves and fruits.

chemical section